I know. I haven't posted in a month. With the antique show last week and all the other stuff, I haven't had a lot of time to work on the boat.
But I got out there today.
Today I started putting some of the hardware back on. I put part of the rubrails back on, and put the bow light and the dock line guide thingies (another nautical term that I haven't learned). When I hooked it up to a battery, the bow light did not work, though. There's a break in the line somewhere. I'm probably going to replace the line entirely, rather than trying to hunt down the short.
I also ran the pitot tube for the speedometer and the wires for the trim/lift control from the dash to the stern.
Isabel was a big help.
Tuesday, May 11, 2010
Sunday, April 11, 2010
More work, inside and out...
I go a ton of stuff done this weekend. On Saturday, I did not bring the camera with me but I put another coat of varnish on the gunwale, transom and bow deck. Then I crawled under the boat and continued scraping the bottom. I got out all of the old caulking between the keel and both garboards. I do not know what kind of paint the previous owners put on the bottom, but it certainly was not bottom paint. It flaked off like dandruff. Underneath it, the original red lead (I think) primer was still hard as a rock.
Later on (after the varnish dried), I noticed that the brand new wood on the garboard looked too good compared to the old wood next to it. So I sanded down the old stuff and put stain on it.
Today I remembered the camera.
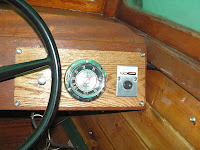
I started out working on the dashboard. I mounted the 1/4 inch oak piece that I had cut and finished. I put it over all of the holes that were there from the two starter plates, light switches and speedometer. The I re-mounted the speedometer, the light switch, and the power tilt/trim switch to the oak. The only thing that is connected is the light switch. My pitot tube for the spedometer was about 8 inches too short. I'll have to buy a new one. Thankfully, it is one of the few things on a boat that is inexpensive. The trim/tilt switch will not be connected until I mount the engine.
After that, I set up the table. I decided to not have the table leg permanently attached to the table. Originally, I was going to have it attached by a hinge so that it could fold up behing the table while underway. But I think that would rattle around too much while the boat is in motion. So I decided to cut 4 pieces of lefover 1/4 inch oak into small "L" shapes, and attach 2 of them to the floor and 2 of them to the underside of the table. That way when the table is needed, we can just flip the table up, set the leg between the L's and we'd be good to go. The leg can be stored under the rear facing seat. The L's are down in the basement getting their paint and varnish, so they are not in the picture.
Then, I put another coat of varnish on the gunwale (old and new), and on the transom. And I put the final coat of white on the starboard side, and the first coat of white on the port.
Later on (after the varnish dried), I noticed that the brand new wood on the garboard looked too good compared to the old wood next to it. So I sanded down the old stuff and put stain on it.
Today I remembered the camera.
I started out working on the dashboard. I mounted the 1/4 inch oak piece that I had cut and finished. I put it over all of the holes that were there from the two starter plates, light switches and speedometer. The I re-mounted the speedometer, the light switch, and the power tilt/trim switch to the oak. The only thing that is connected is the light switch. My pitot tube for the spedometer was about 8 inches too short. I'll have to buy a new one. Thankfully, it is one of the few things on a boat that is inexpensive. The trim/tilt switch will not be connected until I mount the engine.
After that, I set up the table. I decided to not have the table leg permanently attached to the table. Originally, I was going to have it attached by a hinge so that it could fold up behing the table while underway. But I think that would rattle around too much while the boat is in motion. So I decided to cut 4 pieces of lefover 1/4 inch oak into small "L" shapes, and attach 2 of them to the floor and 2 of them to the underside of the table. That way when the table is needed, we can just flip the table up, set the leg between the L's and we'd be good to go. The leg can be stored under the rear facing seat. The L's are down in the basement getting their paint and varnish, so they are not in the picture.
Then, I put another coat of varnish on the gunwale (old and new), and on the transom. And I put the final coat of white on the starboard side, and the first coat of white on the port.
Saturday, April 3, 2010
The job that I've been procrastinating
I've been putting off painting the bilge for too long. Back in the fall, I did some of it under the front cockpit. It was back-breaking, tedious work. So, I haven't been looking forward to doing the rest of the bilge. Today, I decided to finish it.
I took out all the floorboards and set them aside. Then I hit the whole thing with the shop vac. It's amazing how much sawdust, mud, and screws you can find in the bottom of a boat. I even found an old hat that I must have left in there.
After about 3 hours. I got it done. It may need another coat.
After that, I put the second coat of white on the starboard side, and the 3rd coat on the transom and gunwale.
I also prepared the table leg and a piece of nice oak for the dashboard with stain and varnish.
I took out all the floorboards and set them aside. Then I hit the whole thing with the shop vac. It's amazing how much sawdust, mud, and screws you can find in the bottom of a boat. I even found an old hat that I must have left in there.
After about 3 hours. I got it done. It may need another coat.
After that, I put the second coat of white on the starboard side, and the 3rd coat on the transom and gunwale.
I also prepared the table leg and a piece of nice oak for the dashboard with stain and varnish.
Sunday, March 21, 2010
Got even more done today...
2 nice days in a row!?
Kathy took the girls to her Dad's and then grocery shopping, leaving me some time to work on the boat. I started out with continuing the work I started yesterday. With some steel wool, I hit all of the spots that I put varnish on yesterday, including the deck, transom, splashwell, and gunwale. Then I started sanding the bow. I discovered that under all of the layers of paint and fairing compound from previous renovations, the original brass cutwater was still there. I scraped off the paint and buffed it out with some emery cloth. The original gloss is long gone, but it will dull to a nice patina, I think. The section below the bow eye will have to be removed before I can work on the bottom, but the very bottom screw head is stripped out, and I can't find by screw remover bit. I may have to pick up a new one.
After that, I hit everything with the shop vac and tack cloth to clean up all of the dust. Then I put a second coat of varnish on the transom, spashwell, and gunwale. I also put a 6th coat on the bow deck.
After all that, the kids were keeping themselves occupied for once, so I kept going. I put the first coat of white on the starboard side. It will take about 2-3 more coats to really smooth it out, the first coat was drank up by the very dry wood.
Kathy took the girls to her Dad's and then grocery shopping, leaving me some time to work on the boat. I started out with continuing the work I started yesterday. With some steel wool, I hit all of the spots that I put varnish on yesterday, including the deck, transom, splashwell, and gunwale. Then I started sanding the bow. I discovered that under all of the layers of paint and fairing compound from previous renovations, the original brass cutwater was still there. I scraped off the paint and buffed it out with some emery cloth. The original gloss is long gone, but it will dull to a nice patina, I think. The section below the bow eye will have to be removed before I can work on the bottom, but the very bottom screw head is stripped out, and I can't find by screw remover bit. I may have to pick up a new one.
Saturday, March 20, 2010
Sunny Day...
Today I got a bunch done. I started out working on the splashwell, the replacement gunwale, and the transom. I took a light grade sandpaper to the floor of the spashwell just to take off the top layer of varnish. The finish there wasn't too bad and did not need to be sanded to bare wood, it had only lost it's sheen and hadn't peeled. I then put a layer of new varnish on it.
Next I put a layer of varnish on the gunwale that I replaced. It will be the first of many.
Then I put a layer on the upper transom. I left off below the waterline because I wan't the bottom paint to soak into the wood as much as possible.
Next, I put another layer on the bow deck. I figure maybe one or 2 more coats and it will be done.
Lastly, I put a final layer of the green topside paint on the starboard sheerstrake.
Next I put a layer of varnish on the gunwale that I replaced. It will be the first of many.
Then I put a layer on the upper transom. I left off below the waterline because I wan't the bottom paint to soak into the wood as much as possible.
Next, I put another layer on the bow deck. I figure maybe one or 2 more coats and it will be done.
Lastly, I put a final layer of the green topside paint on the starboard sheerstrake.
Wednesday, March 17, 2010
The mud is gone...
...for the most part.
The ground is still a little soft and mushy under the boat. But at least I can walk on it without losing a shoe. With that good news I finally got back to work on the boat.
I put stain on the transom. It looks a little dark on the bottom plank, but that doesn't matter. That plank will be below the water line, so it will be covered by the bottom paint and the boot stripe.
I put another layer of the green paint on the starboard side sheer strake (nautical term I learned). And fixed up a scratch on the port side hull from when the shed flipped over. One of the shed legs must have hit the side of the boat as it was going up and over, during that wind storm.
Earlier in the week I, put the last coats of paint on the engine hood, and filled in the emblem with the same green as the sheer strake. That way the engine will at least match the boat's color, even if it doesn't match the boat's age.
The ground is still a little soft and mushy under the boat. But at least I can walk on it without losing a shoe. With that good news I finally got back to work on the boat.
I put stain on the transom. It looks a little dark on the bottom plank, but that doesn't matter. That plank will be below the water line, so it will be covered by the bottom paint and the boot stripe.
I put another layer of the green paint on the starboard side sheer strake (nautical term I learned). And fixed up a scratch on the port side hull from when the shed flipped over. One of the shed legs must have hit the side of the boat as it was going up and over, during that wind storm.
Earlier in the week I, put the last coats of paint on the engine hood, and filled in the emblem with the same green as the sheer strake. That way the engine will at least match the boat's color, even if it doesn't match the boat's age.
Saturday, March 6, 2010
Motor work
The boat house, outside is surrounded by deep snow, that is just starting to melt. Where do you think the water has been collecting?
In the boat house. There is about 2 inches of standing water on top of about 4 inches of mud. The snow melted, dissolved the dirt floor and is just sitting there, waiting for me to step in it. But I'm not playing that game. I have indoor work to do.
I started working on the cowl hood for the new motor. I took off the dried out gasket, and took off the front ID plate (which was about to fall off). Then I started cleaning.
I then hit it with some light sandpaper, and put a coat of marine enamel on it. Here is what it looked like before...
In the boat house. There is about 2 inches of standing water on top of about 4 inches of mud. The snow melted, dissolved the dirt floor and is just sitting there, waiting for me to step in it. But I'm not playing that game. I have indoor work to do.
I started working on the cowl hood for the new motor. I took off the dried out gasket, and took off the front ID plate (which was about to fall off). Then I started cleaning.
I then hit it with some light sandpaper, and put a coat of marine enamel on it. Here is what it looked like before...
And after the first coat...
Subscribe to:
Posts (Atom)


