Friday, May 28, 2010

Prepping for bottom paint...

Tonight I had an extra hour or so to work on the boat, so I crawled under and continued the scraping process. Earlier in the project I had sanded some of the old bottom paint, but did not get all the way under the trailer due to mud (and laziness).

I started tonight on those areas. Instead of the sander, I just dry scraped. The old paint came off relatively easy. The red primer was still hard as a rock and embedded deep in the wood, so that will stay. The various coats of "whatever" paint came off.

I finished from the transom all the way to just in front of the trailer axles. From there forward should be easier as there is less trailer to get in the way.

Also, climbing under the boat and working on every plank allowed me to get a really good impression of the condition of all of the planks, fasteners and seams:

The good news - all of the planks are in great shape. There is no rot. Also there are no gaps in the seams between the planks. The only gap is between the keel and the garboards. It was filled with caulk, which is now gone. I will replace it.

The bad news. All of the putty covering the plank fasteners came out with the paint. That will have to be refilled. A little bit more work, but I gave up on my Memorial Day launch plans anyway.

Earlier in the week, I tested the engine connections and attached the seals on the cowl hood.

Monday, May 24, 2010

Boot Stripe and Hull tags


Worked on painting some more this weekend.

I taped and masked up for the boot stripe all the way around the boat. And then painted it black. There are a couple of spots that'll need to be touched up, but all in all, the tape worked. I used "Frog Tape". It is a green painter's tape, made for auto painting.


Then, I put on the hull tags that I ordered through Lyman Boat Works.


Wednesday, May 19, 2010

This past weekend...

I got some more work done.

(not pictured) I put the final coat of white on the sides of the hull. Next I'll do the boot stripe and then the bottom.

I put the rest of the rub rails on and touched up a little of the green paint where I misjudged how much the rail would cover.

I then pulled all of the canvas that came with the boat out of the basement. I haven't really looked at it. I was fully expecting it to be completely unusable. I was wrong. The main top was dirty, but fully intact. I hit it with a hose and a little elbow grease, and it's nearly good enough to use as is. It started out almost battleship gray, and turned out like this...

(not pictured)The top that goes from the main top to the stern was in perfect shape. I was totally surprised. I hosed off the dust, and it was good to go. The side curtains may need a little more work. The plastic windows are creased from being rolled up for so long and there are rust stains on the canvas. So they'll need more cleaning.

Tuesday, May 11, 2010

I have not given up

I know. I haven't posted in a month. With the antique show last week and all the other stuff, I haven't had a lot of time to work on the boat.

But I got out there today.

Today I started putting some of the hardware back on. I put part of the rubrails back on, and put the bow light and the dock line guide thingies (another nautical term that I haven't learned). When I hooked it up to a battery, the bow light did not work, though. There's a break in the line somewhere. I'm probably going to replace the line entirely, rather than trying to hunt down the short.

I also ran the pitot tube for the speedometer and the wires for the trim/lift control from the dash to the stern.

Isabel was a big help.

Sunday, April 11, 2010

More work, inside and out...

I go a ton of stuff done this weekend. On Saturday, I did not bring the camera with me but I put another coat of varnish on the gunwale, transom and bow deck. Then I crawled under the boat and continued scraping the bottom. I got out all of the old caulking between the keel and both garboards. I do not know what kind of paint the previous owners put on the bottom, but it certainly was not bottom paint. It flaked off like dandruff. Underneath it, the original red lead (I think) primer was still hard as a rock.

Later on (after the varnish dried), I noticed that the brand new wood on the garboard looked too good compared to the old wood next to it. So I sanded down the old stuff and put stain on it.

Today I remembered the camera.

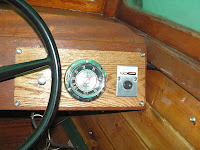
I started out working on the dashboard. I mounted the 1/4 inch oak piece that I had cut and finished. I put it over all of the holes that were there from the two starter plates, light switches and speedometer. The I re-mounted the speedometer, the light switch, and the power tilt/trim switch to the oak. The only thing that is connected is the light switch. My pitot tube for the spedometer was about 8 inches too short. I'll have to buy a new one. Thankfully, it is one of the few things on a boat that is inexpensive. The trim/tilt switch will not be connected until I mount the engine.
After that, I set up the table. I decided to not have the table leg permanently attached to the table. Originally, I was going to have it attached by a hinge so that it could fold up behing the table while underway. But I think that would rattle around too much while the boat is in motion. So I decided to cut 4 pieces of lefover 1/4 inch oak into small "L" shapes, and attach 2 of them to the floor and 2 of them to the underside of the table. That way when the table is needed, we can just flip the table up, set the leg between the L's and we'd be good to go. The leg can be stored under the rear facing seat. The L's are down in the basement getting their paint and varnish, so they are not in the picture.

Then, I put another coat of varnish on the gunwale (old and new), and on the transom. And I put the final coat of white on the starboard side, and the first coat of white on the port.

Saturday, April 3, 2010

The job that I've been procrastinating

I've been putting off painting the bilge for too long. Back in the fall, I did some of it under the front cockpit. It was back-breaking, tedious work. So, I haven't been looking forward to doing the rest of the bilge. Today, I decided to finish it.

I took out all the floorboards and set them aside. Then I hit the whole thing with the shop vac. It's amazing how much sawdust, mud, and screws you can find in the bottom of a boat. I even found an old hat that I must have left in there.

After about 3 hours. I got it done. It may need another coat.

After that, I put the second coat of white on the starboard side, and the 3rd coat on the transom and gunwale.

I also prepared the table leg and a piece of nice oak for the dashboard with stain and varnish.

Sunday, March 21, 2010

Got even more done today...

2 nice days in a row!?

Kathy took the girls to her Dad's and then grocery shopping, leaving me some time to work on the boat. I started out with continuing the work I started yesterday. With some steel wool, I hit all of the spots that I put varnish on yesterday, including the deck, transom, splashwell, and gunwale. Then I started sanding the bow. I discovered that under all of the layers of paint and fairing compound from previous renovations, the original brass cutwater was still there. I scraped off the paint and buffed it out with some emery cloth. The original gloss is long gone, but it will dull to a nice patina, I think. The section below the bow eye will have to be removed before I can work on the bottom, but the very bottom screw head is stripped out, and I can't find by screw remover bit. I may have to pick up a new one.


After that, I hit everything with the shop vac and tack cloth to clean up all of the dust. Then I put a second coat of varnish on the transom, spashwell, and gunwale. I also put a 6th coat on the bow deck.


After all that, the kids were keeping themselves occupied for once, so I kept going. I put the first coat of white on the starboard side. It will take about 2-3 more coats to really smooth it out, the first coat was drank up by the very dry wood.